Saturday, June 23, 2012

SQUID Configuration On RHEL-5

SQUID Configuration On RHEL-5
  SQUID (PROXY SERVER)
Setup:


Server: maheshlinux-server (192.168.4.1 Local Network IP)

Client: Linux & Windows XP/2003 etc...

Default Port NO: 3128


Requirement: This SQUID package available on RHEL5 DVD only

squid-2.6.STABLE6-3.el5

Installation Of Required Packages:

[root@maheshlinux-server RHEL5_Total_Pack]# rpm -i squid-2.6.STABLE6-3.el5

warning: squid-2.6.STABLE6-3.el5: Header V3 DSA signature: NOKEY, key ID 37017186

[root@maheshlinux-server RHEL5_Total_Pack]#

Configure SQUID config file:


NOTE: Modify squid.conf file (Before Modifying any Files take one backup copy)


[root@maheslinux-server ~]# cd /etc/squid

[root@maheshlinux-server squid]# vi squid.conf

Uncomment Bellow lines in config file...


Access Control Lists

# Add in ACL your local network information

acl all src 192.168.1.0/255.255.255.0 (Allow here your local network Address)


One Sample Passage for ACL configuration


#Recommended minimum configuration:

acl all src 192.168.4.0/255.255.255.0

acl manager proto cache_object

acl localhost src 127.0.0.1/255.255.255.255

acl to_localhost dst 127.0.0.0/8

acl SSL_ports port 443

acl Safe_ports port 80 # http

acl Safe_ports port 21 # ftp

acl Safe_ports port 443 # https

acl Safe_ports port 70 # gopher

acl Safe_ports port 210 # wais

acl Safe_ports port 1025-65535 # unregistered ports

acl Safe_ports port 280 # http-mgmt

acl Safe_ports port 488 # gss-http

acl Safe_ports port 591 # filemaker

acl Safe_ports port 777 # multiling http

acl CONNECT method CONNECT

acl blocksites dstdomain .orkut.com

acl blocksites dstdomain .facebook.com

acl blocksites dstdomain .youtube.com

http_access deny blocksites

acl banned src 192.168.4.3

http_access deny banned

acl localnetwork src 192.168.1.0/24

http_access allow localnetwork

acl blockfiles urlpath_regex /etc/squid/blocks.files.acl

deny_info ERR_BLOCKED_FILES blockfiles

http_access deny blockfiles

acl business_hours time M T W H F 9:00-19:00

acl RestrictedHost src 192.168.1.3

http_access deny RestrictedHost

http_access allow business_hours

acl bad url_regex "/etc/squid/squid-block.acl"

http_access deny bad


Now Try To Start SQUID Service & Keep Permanently On:


[root@maheshlinux-server squid]# service squid status

squid is stopped

[root@maheshlinux-server squid]# service squid start

Starting squid: [OK]

[root@maheshlinux-server squid]# chkconfig squid on

[root@maheshlinux-server squid]#


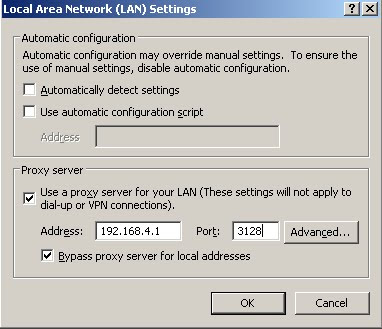
Now Check SQUID/PROXY with Windows Client:


Go To Internet Explore --> Properties --> Connections --> LAN Settings --> Use a Proxy Server for your LAN --> Give server IP or Name --> Port 3128 --> OK


BLOCKED SITE EXAMPLE (ORKUT SITE)


For Writing our own Notice Messages and all modification you can do in /usr/share/squid/errors/English

[root@maheshlinux-server English]# vi ERR_ACCESS_DENIED

Write Message Save & Exit and Restart once your squid server.


Use xming, xshell to display linux gui to windows desktop (x11 forwarding) -

Use xming, xshell to display linux gui to windows desktop (x11 forwarding) -
Firstly, download xming, install it on your windows pc system.


You can go to http://sourceforge.net/projects/xming/files/ to download.

Let’s assume that you want to run xclock on solaris/linux server 192.168.0.3, and want the gui display on your pc whose ip is 192.168.0.4.

After installation xming on your windows, log in linux/solaris server 192.168.0.3. Set environment variable DISPLAY to the ip address of your windows, and append a :0 to it:

#export DISPLAY=192.168.0.4:0

Then you must allow X11 forwarding in sshd configuration file. That is, set X11Forwarding to yes in /etc/ssh/sshd_config and restart your sshd daemon.

After this, you need set 192.168.0.3(linux/solaris) to the allowed server list on your windows. Edit X0.hosts which locates at the installation directory of xming(For example, C:\Program Files\Xming\X0.hosts), add a new entry in it:192.168.0.3, the ip address of linux/solaris that you want to run x11 utility from.

Note: Thanks to linuxdict.com :D

Then, restart xming on your windows. And on solaris/linux server(192.168.0.3), run a X11 programe, like

#/usr/openwin/bin/xclock &

You will then see a clock gui pop up in your windows pc.

Amazing, isn’t that?

PS: Something from xshell x11 faq:(Actually, this step is not necessary to our goal)

Q:How do I run the X11 applications through Xshell?

X11 forwarding is a bit different from other TCP/IP port forwarding.

Please, go through the following steps.

1. To enable X11 forwarding service in Xshell: On the Tunneling tab of Advanced SSH Options dialog box, check Forward X11 Connections To. and select Xmanager if Xmanager is installed in your PC. If you use another PC X server, select X Display Location and enter the proper display name.

2. To enable X11 forwarding service in the SSH server: Setup the configuration file in the following table.

SSH server           Config file                          Setup

OpenSSH       /etc/ssh/sshd_config         X11Forwarding yes

SSH.COM    /etc/ssh2/sshd2_config      AllowX11Forwarding yes

3. To run X11 applications from the Xshell terminal:

1. If Xmanager is installed on your PC, just go to the next step. Otherwise, run the PC X server installed on your PC first.

2. Start the SSH connection with the session enabling X11 Forwarding.

3. At the shell prompt of Xshell, execute the X11 applications like the following examples:[nathaniel@intranet ~]$ xterm &

[nathaniel@intranet ~]$ startkde &

[nathaniel@intranet ~]$ gnome-session &

NetworkManager ‘device not managed’ Fix

NetworkManager ‘device not managed’ Fix

Recently I ran into an issue where a new installation of Debian didn’t have NetworkManager set up correctly. Everytime I tried to use NetworkManager it had an issue with the devices not being managed. Luckily there was a man page for networkmanager.conf and its a quick fix.


All you have to do is

sudo vi /etc/NetworkManager/NetworkManager.conf

and change:

[ifupdown]

managed=false

# to

[ifupdown]

managed=true

# Then
sudo service network-manager restart

And it’s fixed. Your wireless and ethernet connections will then be managed by NetworkManager. If you don’t want network manager to manage anymore you can just stop the service, or disable it at boot time by removing it from your /etc/rc[x].d/ directory where [x] corresponds to your runlevel. Enjoy!

Auto mounting a partition

Auto mounting a partition

It’s been a while. A while since I’ve had to actually had to manually edit the /etc/fstab to automount a partition. So long, that I searched my blog trying to find out how to do it. To my surprise, I’d never actually written one. If I had, I couldn’t find it. Here’s to you, memory:

According to /etc/fstab this is how it’s done

For those of us that are human, that can mean very little. What you can do, in hopefully slightly more understandable terms is add a line that looks like this:

/dev/sd[abc][x] /mnt/[location] [filesystem] defaults 0 0

What that looks like in my case is:

/dev/sda5 /mnt/sda5 ext4 defaults 0 0

Save, exit and reboot. Hope for the best :)


Sunday, June 17, 2012

How to Configure Ubuntu’s Built-In Firewall


How to Configure Ubuntu’s Built-In Firewall

image
Ubuntu includes its own firewall, known as ufw – short for “uncomplicated firewall.” Ufw is an easier-to-use frontend for the standard Linux iptables commands. You can even control ufw from a graphical interface.
Ubuntu’s firewall is designed as an easy way to perform basic firewall tasks without learning iptables. It doesn’t offer all the power of the standard iptables commands, but it’s less complex.

Terminal Usage

The firewall is disabled by default. To enable the firewall, run the following command from a terminal:
sudo ufw enable
You don’t necessarily have to enable the firewall first. You can add rules while the firewall is offline, and then enable it after you’re done configuring it.

Working With Rules

Let’s say you want to allow SSH traffic on port 22. To do so, you can run one of several commands:
sudo ufw allow 22 (Allows both TCP and UDP traffic – not ideal if UDP isn’t necessary.)
sudo ufw allow 22/tcp  (Allows only TCP traffic on this port.)
sudo ufw allow ssh (Checks the /etc/services file on your system for the port that SSH requires and allows it. Many common services are listed in this file.)
Ufw assumes you want to set the rule for incoming traffic, but you can also specify a direction. For example, to block outgoing SSH traffic, run the following command:
sudo ufw reject out ssh
You can view the rules you’ve created with the following command:
sudo ufw status
To delete a rule, add the word delete before the rule. For example, to stop rejecting outgoing ssh traffic, run the following command:
sudo ufw delete reject out ssh
Ufw’s syntax allows for fairly complex rules. For example, this rule denies TCP traffic from the IP 12.34.56.78 to port 22 on the local system:
sudo ufw deny proto tcp from 12.34.56.78 to any port 22
To reset the firewall to its default state, run the following command:
sudo ufw reset

Application Profiles

Some applications requiring open ports come with ufw profiles to make this even easier. To see the application profiles available on your local system, run the following command:
sudo ufw app list
View information about a profile and its included rules with the following command:
sudo ufw app info Name
Allow an application profile with the allow command:
sudo ufw allow Name

More Information

Logging is disabled by default, but you can also enable logging to print firewall messages to the system log:
sudo ufw logging on
For more information, run the man ufw command to read ufw’s manual page.

GUFW Graphical Interface

GUFW is a graphical interface for ufw. Ubuntu doesn’t come with a graphical interface, but gufw is included in Ubuntu’s software repositories. You can install it with the following command:
sudo apt-get install gufw
GUFW appears in the Dash as an application named Firewall Configuration. Like ufw itself, GUFW provides a simple, easy-to-use interface. You can easily enable or disable the firewall, control the default policy for inbound or outbound traffic, and add rules.
The rules editor can be used to add simple rules or more complicated ones.

Remember, you can’t do everything with ufw – for more complicated firewall tasks, you’ll have to get your hands dirty with iptables.

3 Easy Ways to Connect to Windows Shared Folders from Linux


3 Easy Ways to Connect to Windows Shared Folders from Linux

Connecting to file servers is something most people do on a daily basis even without thinking about it. In Linux, it may not be intuitive how to quickly connect to a samba or ftp server without a separate program. Here are a few different ways to connect to a remote file server without needing to touch a terminal.

Using Keyboard Shortcut

You can connect to a server by opening the run application window with the Alt+F2 keyboard shortcut. You will just need to specify the server type by adding the protocol at the beginning of the command. For example smb:// will connect to a samba share; other supported protocols are ssh, ftp, sftp, http, and https.
Note: In the example below my server name is playground and the shared folder is called music.
If your server requires a password to connect, fill out the next window that pops up and select how long you would like it to store your password.
A Nautilus window will automatically open with the server you just connected to, and you should have a shortcut under places on the left side and a shortcut on your desktop.

From GNOME Menu

If you are using Ubuntu, and many other GNOME based distributions, you will have a places menu on your top menu bar. Open that menu and click connect to server.
A new window will open up with a drop down so you can select what type of server you are connecting to.
For a samba/cifs server select Windows share and fill out the required information.
Note: Unlike the run application window, you do not need the slashes to connect here.
Alternatively, you can also get to the connect to server window from Nautilus’ file menu.

With a Shortcut

If you would like instant access to the connect to server window from your GNOME menu bar right click on the menu you would like to add the shortcut to and click add to panel.
In the window that pops up, search for “connect” and connect to server should be one of the results. Highlight the shortcut and click add at the bottom of the window.
Now you will have an additional shortcut on your GNOME bar for easy access.

10 Ways to Generate a Random Password from the Command Line


10 Ways to Generate a Random Password from the Command Line

image
One of the great things about Linux is that you can do the same thing hundreds of different ways—even something as simple as generating a random password can be accomplished with dozens of different commands. Here’s 10 ways you can do it.
We gathered all of these commands from Command-Line Fu and tested them out on our own Linux PC to make sure they work. You should be able to use at least some of these on Windows with Cygwin installed, though we didn’t test all of them—the last one definitely works though.

Generate a Random Password

For any of these random password commands, you can either modify them to output a different password length, or you can just use the first x characters of the generated password if you don’t want such a long password. Hopefully you’re using a password manager like LastPass anyway so you don’t need to memorize them.
This method uses SHA to hash the date, runs through base64, and then outputs the top 32 characters.
date +%s | sha256sum | base64 | head -c 32 ; echo
This method used the built-in /dev/urandom feature, and filters out only characters that you would normally use in a password. Then it outputs the top 32.
< /dev/urandom tr -dc _A-Z-a-z-0-9 | head -c${1:-32};echo;
This one uses openssl’s rand function, which may not be installed on your system. Good thing there’s lots of other examples, right?
openssl rand -base64 32
This one works a lot like the other urandom one, but just does the work in reverse. Bash is very powerful!
tr -cd '[:alnum:]' < /dev/urandom | fold -w30 | head -n1
Here’s another example that filters using the strings command, which outputs printable strings from a file, which in this case is the urandom feature.
strings /dev/urandom | grep -o ':alnum:' | head -n 30 | tr -d '\n'; echo
Here’s an even simpler version of the urandom one.
< /dev/urandom tr -dc _A-Z-a-z-0-9 | head -c6
This one manages to use the very useful dd command.
dd if=/dev/urandom bs=1 count=32 2>/dev/null | base64 -w 0 | rev | cut -b 2- | rev
You can even create a random left-hand password, which would let you type your password with one hand.
If you’re going to be using this all the time, it’s probably a better idea to put it into a function. In this case, once you run the command once, you’ll be able to use randpwanytime you want to generate a random password. You’d probably want to put this into your ~/.bashrc file.
randpw(){ < /dev/urandom tr -dc _A-Z-a-z-0-9 | head -c${1:-16};echo;}
You can use this same syntax to make any of these into a function—just replace everything inside the { }
And here’s the easiest way to make a password from the command line, which works in Linux, Windows with Cygwin, and probably Mac OS X. I’m sure that some people will complain that it’s not as random as some of the other options, but honestly, it’s random enough if you’re going to be using the whole thing.
date | md5sum
Yeah, that’s even easy enough to remember.

Use Gmail IMAP in Microsoft Outlook 2007


Use Gmail IMAP in Microsoft Outlook 2007


We’ve all been hearing about the new IMAP support in Gmail, but 
how do we access that from Outlook? Those of you that have been
 waiting patiently will be happy to know all the instructions are on this page.
Using IMAP we can synchronize email across multiple devices, since 
the mail stays on the server. You already stopped reading this part a
nd skipped down to the instructions, didn’t you?
Enable IMAP in Gmail Settings
Open your Settings panel in Gmail, and then click on 
the “Forwarding and POP/IMAP” tab.
image
Now click the Enable IMAP radio button, and click Save Changes.
image
Add Account to Outlook
Use the Tools menu you to open the Account Settings panel.
image
If this is your first account you’ll be prompted for the wizard, otherwise you’ll need to click the New button under the E-mail tab.
image
Now select the “Microsoft Exchange, POP3, IMAP or HTTP” option and hit next.
image
Select the checkbox for “Manually configure server settings” and everything on that page will gray out. Hit the next button again.
image
Now select “Internet E-mail”  (Didn’t we just do this? This wizard is taking too long…)
image
Finally we can enter some settings! Add in all your personal information here.
image
Note: If you are outside of the US you may need to use imap.googlemail.com and smtp.googlemail.com instead of imap.gmail.com and smtp.gmail.com.
Note: for Gmail Apps accounts, you’ll need to put in your full email
 address wherever you see an @gmail.com above. For instance,
 if your account was geek@howtogeek.com you would put that in 
the E-mail address field as well as the User Name field.
Click on the “More Settings” button and find the Outgoing Server tab, 
where you’ll need to check the box for “My outgoing server requires authentication”
image
Now choose the Advanced tab, and enter the following values (Very important)
  • Incoming Server: 993
  • Incoming Server encrypted connection: SSL
  • Outgoing Server: 587
  • Outgoing Server encrypted connection: TLS
image
Note: If you are having an issue with your sent email not showing up in 
Gmail, you can use the Folders tab, and then select the [Gmail] \ Sent Mail folder.
Note: Only do this step if your mail is not showing up, otherwise it will 
duplicate the sent mail.
image 
Now that you’ve closed out that dialog, you can click the Test Account 
Settings button to make sure everything is going to work.
image
If all goes well, you should see a success message.
image
Note: Some ISPs restrict outgoing mail, so if you have a problem sending 
a test message you’ll need to consult with their documentation.
Accessing Your Mail
Now that everything is working you’ll notice a new set of folders for your 
Gmail account. (I’m using Gmail apps, which is why you don’t see an @gmail.com
 email address)
All of your labels will show up as separate folders, and the built-in “folders” in 
Gmail will be under the new [Gmail] folder.
 image
Outlook Flags = Gmail Stars
If you want to star a message in Gmail, you just need to flag it in Outlook. 
When I flagged this message from Mysticgeek…
image 
It shows up in Gmail as a starred message. (And it works the other way too)
image
Sending Email from Outlook
To send a new email from your Gmail account, just change the “Account” 
drop-down to your Gmail address before you send a message.
image
Note that if you only use Gmail, you won’t have this drop-down and it will 
default to your Gmail.
Final Thoughts
Here’s a few things to keep in mind:
  • Gmail Labels = Outlook Folders. To label a message, add it to a folder.
  • Gmail Stars = Outlook Flags.
  • Do Not move spam messages to the “Junk E-mail” folder in Outlook, 
  • move them to the [Gmail] \ Spam folder.
  • Outlook has a built-in Search Folder for “Large Mail”, which will let
  •  you easily find messages with large attachments.
Now that you can access your starred and labeled messages, you can s
tart using Outlook’s excellent Search Folders to find messages more easily.

how to configure Nat(Network Address Translation ) in window server 2003

how to configure Nat(Network Address Translation ) in win 2003
Situation: I am an administrator of a small company with 20 computers. I’m getting my internet services through a DSL connection. I’m using Microsofttechnologies; hence, my server is Windows 2003 Server. I want to distribute internet to all the computers through the main server.
Solution: You can use Windows Routing and Remote Access tool for this situation. Follow the following steps to provide internet facilities to every computer using your Windows 2003 Server.
1- Firstly, you will need two IP addresses, one for the DSL modem interface and the other for the local LAN interface. Either you can install two NICs (LAN Cards) or alternatively you can assign two IP addresses to your existing NIC. One IP address is for the LAN and the other is for connecting to the internet.

2- In your Windows 2003 Server, go to Start –> All Programs –> Administrative Tools –> Routing and Remote Access

3- Right Click the server in the left hand pane and select “Configure and Enable Routing and Remote Access”


4- Routing and Remote Access Wizard will appear, click Next.
5- Select Network Address Translation (NAT) and then click Next.
6- Select the interface that connects you to the internet and click Next.


7- Click Finish.
This will enable NAT on your server. Now configure the network settings of your client computer and give the default gateway of your server LAN interface. Or if you have setup a DHCP server in your network, configure the DHCP server accordingly.
This is all that is required

Wednesday, June 6, 2012

RHCE Linux System Administrations commands descriptions and examples


RHCE Linux System Administrations commands descriptions and examples

halt

This command shuts down the operating system, but can only be run by the root user.
#halt

reboot

This command shuts down and restarts the operating system. It also can only be run by root.
#reboot           [will perform simple reboot]
#reboot -f [will perform fast reboot ]

init 0

This command also shuts down the operating system, and can only be run by your root user.
#init 0

init 6

This command also shuts down and restarts the operating system. It also can only be run by root
#init 6

man

This command opens the manual page for the command or utility specified. The man utility is a very useful tool. If you are unsure how to use any command, use man to access its manual page. For example, you could enter man ls at the shell prompt to learn how to use the ls utility.
#man ls

info

The info utility also displays a help page for the indicated command or utility. The information displayed with info command will be in-depth than that displayed in the man page for the same command.
info ls

su

This command switches the current user to a new user account. For example, if you’re logged in as vickey and need to change to user account to vinita, you can enter su vinita at the shell prompt. This command is most frequently used to switch to the superuser root account.
In fact, if you don’t supply a username, this utility assumes that you want to change to the root account. If you enter su -, then you will switch to the root user account and have all of root’s environment variables applied.
This command require password of the user you want switch.
Looking for Files
There are two basic commands used for file searches: find and locate

find

The find command searches through directories and subdirectories for a desired file. For example, if you wanted to find the directory with the grub.conf linux boot loader file, you could use the following command, which would start the search in the top-level root (/) directory:
# find / -name grub.conf
But this search took several minutes to get it task done. Alternatively, if you know that this file is located in the /etc subdirectory tree, or /boot/grub/grub.conf you could start in that directory with the following command:
# find /etc -name grub.conf

locate

If this is all too time-consuming, RHEL 5 includes a default database of all files and directories. Searches with the locate command are almost instantaneous. And locate searches don't require the full file name. The drawback is that the locate command database is normally updated only once each day, as documented in the /etc/cron.daily/mlocate.cron script.

Getting into the Files

Now that you see how to find and get around different files, it's time to start reading, copying, and moving the files around. Most Linux configuration files are text files. Linux editors are text editors. Linux commands are designed to read text files. If in doubt, you can check the file types in the current directory with the
file * command.

cat

The most basic command for reading files is cat. The cat filename command scrolls the text within the filename file. It also works with multiple file names; it concatenates the file names that you might list as one continuous output to your screen. You can redirect the output to the file name of your choice.

more and less

Larger files demand a command that can help you scroll through the file text at your leisure. Linux has two of these commands:
more and less.
With the more filename command, you can scroll through the text of a file, from start to finish, one screen at a time. With the less filename command, you can scroll in both directions through the same text with the PAGE UP and PAGE DOWN keys. Both commands support vi-style searches.

head and tail

The head and tail commands are separate commands that work in essentially the same way. By default, the head filename command looks at the first 10 lines of a file; the tail filename command looks at the last 10 lines of a file. You can specify the number of lines shown with the -nx switch. Just remember to avoid the space when specifying the number of lines; for example, the
# tail -n15 /etc/passwd
command lists the last 15 lines of the /etc/passwd file.

cp

The cp (copy) command allows you to take the contents of one file and place a copy with the same or different name in the directory of your choice. For example, the cp file1 file2 command takes the contents of file1 and saves the contents in file2. One of the dangers of cp is that it can easily overwrite files in different directories, without prompting you to make sure that's what you really wanted to do.

mv

While you can't rename a file in Linux, you can move it. The mv command essentially puts a different label on a file. For example, the mv file1 file2 command changes the name of file1 to file2. Unless you're moving the file to a different partition, everything about the file, including the inode number, remains the same.

ln

You can create a linked file.
linked files are common with device files such as /dev/dvdwriter and /dev/par0. They're also useful for making sure that multiple users have a copy of the same file in their directories. Hard links include a copy of the file. As long as the hard link is made within the same partition, the inode numbers are identical. You could delete a hard-linked file in one directory, and it would still exist in the other directory. For example, the following command creates a hard link from the actual Samba configuration file to smb.conf in the local directory:
# ln smb.conf /etc/samba/smb.conf
On the other hand, a soft link serves as a redirect; when you open up a file created with a soft link, you're directed to the original file. If you delete the original file, the file is lost. While the soft link is still there, it has nowhere to go. The following command is an example of how you can create a soft link:
# ln -s smb.conf /etc/samba/smb.conf

sort

You can sort the contents of a file in a number of ways. By default, the sort command sorts the contents in alphabetical order depending on the first letter in each line. For example, the sort /etc/passwd command would sort all users (including those associated with specific services and such) by username.

grep and egrep

The grep command uses a search term to look through a file. It returns the full line that contains the search term. For example, grep 'vickey' /etc/passwd looks for my name in the /etc/passwd file.
The egrep command is more forgiving; it allows you to use some unusual characters in your search, including +, ?, |, (, and). While it's possible to set up grep to search for these characters with the help of the backslash, the command can be awkward to use.

wc

The wc command, short for word count, can return the number of lines, words, and characters in a file. The wc options are straightforward: for example, wc -w filename returns the number of words in that file.

sed

The sed command, short for stream editor, allows you to search for and change specified words or even text streams in a file. For example, the following command changes the first instance of the word Windows to the word Linux in each line of the file data, and writes the result to the file newdata:
# sed 's/Windows/Linux/' data > newdata
However, this may not be enough. If a line contains more than one instance of Windows, the above sed command does not change the second instance of that word. But you can make it change every appearance of Windows by adding a "global" suffix:
# sed 's/Windows/Linux/g' data > newdata

awk

The awk command, named for its developers (Aho, Weinberger, and Kernighan), is more of a database manipulation utility. It can identify lines with a keyword and read out the text from a specified column in that line. Again, using the /etc/passwd file, for example, the following command will read out the username of every user with a vickey in the comment column:
# awk '/vickey/ {print $1}' /etc/passwd

ps

It's important to know what's running on your Linux computer. The ps command has a number of critical switches. When trying to diagnose a problem, it's common to get the fullest possible list of running processes, and then look for a specific program. For example, if the Firefox Web browser were to suddenly crash, you'd want to kill any associated processes. The ps aux | grep firefox command could then help you identify the process(es) that you need to kill.

who and w

If you want to know what users are currently logged into your system, use the who command or the w command. This can help you identify the usernames of those who are logged in, their terminal connections, their times of login, and the processes that they are running.

Wildcards

Sometimes you may not know the exact name of the file or the exact search term. This is when a wildcard is handy. The basic wildcards are shown
env
This command displays the environment variables for the currently logged-in user.

echo

This command is used to echo a line of text on the screen. It’s frequently used to display environment variables. For example, if you wanted to see the current value of the PATH variable, you could enter
echo $PATH

top

This command is a very useful command that displays a list of all applications and processes currently running on the system. You can sort them by CPU usage, memory usage, process ID number, and which user owns them

which

This command is used to display the full path to a shell command or utility. For example, if you wanted to know the full path to the ls command, you would enter
which ls

whoami

This command displays the username of the currently logged-in user.

netstat

This command displays the status of the network, including current connections, routing tables, etc

route

This command is used to view or manipulate the system’s routing table.

ifconfig

This command is used to manage network boards installed in the system. It can be used to display or modify your network board configuration parameters. This command can only be run by the root user.
Once you become familiar with these basic command which you need to perform RCHE skill you are ready to move our next series of article focused on RHCE exam.